- 14/10/2025
- Tips
The steps to apply a flawless joint!
Tips for applying silicones, sealants, and adhesives.
Choosing a good product is important, and we can help with that. However, it’s also necessary to ensure the ideal conditions to achieve a perfect joint. This way, you can guarantee the best sealing, bonding, and adhesion in your projects.
Step 1: Don’t forget to choose the most suitable product.
Verifique se o produto pode ser aplicado em interiores e/ou exteriores, para que seja adequado ao ambiente onde irá aplicar. Tenha em conta possíveis limitações de uso em certos substratos.
A Pecol desenvolveu uma oferta diversificada com produtos multiusos e produtos concebidos, especialmente, para determinadas utilizações e materiais.
Por exemplo, entre as nossas várias soluções, pode utilizar os seguintes produtos para:
Silicones
- Sealing joints and aluminum frame caulking: Silicone Neutral SilicPower Multipurpose
- Applications in bathrooms and kitchens: Silicone Neutral Sanitary and Kitchen
Ultra Seal & Glue
- Bonding and sealing on roofs: Ultra Seal & Glue Neutral Roofs
- Exterior glass joints with UV resistance: Ultra Seal & Glue Invisible
UltraFix Adhesive
- Mirror bonding: UltraFix Adhesive Mirrors
- Marble and natural stone bonding: UltraFix Adhesive Marbles
Step 2: Prepare the surface where the product will be applied.
How to remove old joints for new application?
The product can be removed with a joint scraper or a utility knife.
If any residue remains on the substrate, or if you prefer an easier removal, use Spray Remover for Silicones, Adhesives, and Paints P130. It quickly dissolves and eliminates cured silicone and adhesive residues.
Clean the surface!
The application area, whether a surface or joint, must be free from dust, oil, grease, and loose particles. Ensure the area is dry, clean, and degreased.
Non-absorbent substrates such as glass, tiles, and plastic should be cleaned with a cloth soaked in alcohol. To ensure proper preparation, we recommend using our cleaning sprays.
After this step, let the area dry and avoid touching it again.
Limit the application area.
Use masking tape, commonly known as painter’s tape, to reduce the risk of staining your work area.
When should you use primers?
Apply primers on absorbent substrates such as wood, masonry, and concrete.
Do not apply primers on substrates whose surface dissolves easily after application, such as polystyrene or acrylic.
We recommend performing a preliminary test and selecting a suitable primer.
Step 3: Now prepare the cartridge.
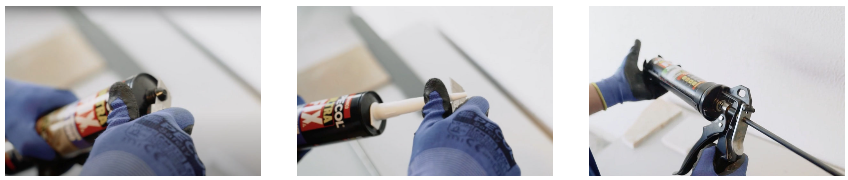
Use a cutting blade to cut the end of the tube and the nozzle according to the desired thickness. We suggest cutting 1.5 cm from the tip at a 60º angle for a higher-quality application.
The application can be carried out using a manual or pneumatic gun.
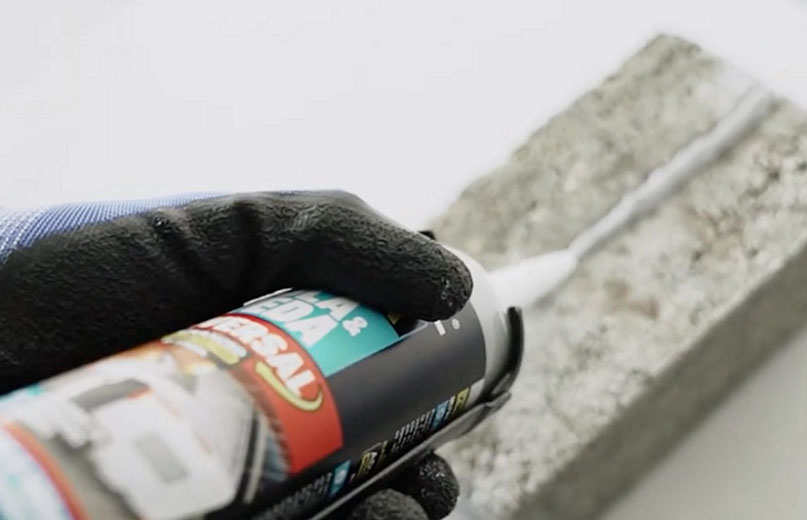
Step 4: You can now finally apply the product.
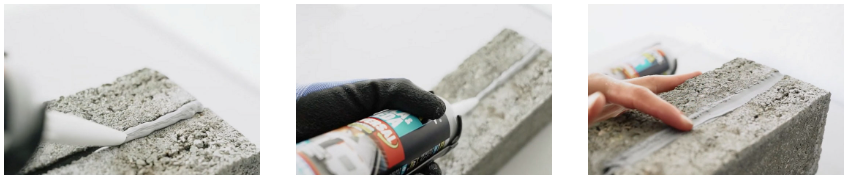
The product should be applied in uniform beads and in an appropriate quantity. When applying a joint, you should make one long, continuous motion.
The size of the joint should be calculated according to the following basic rule: the width should be twice its depth.
And the finishing?
It should also be done in a single process along the entire length of the bead. It can be done with a flat spatula or manually. If smoothing with your finger, wet it with soapy water.
Any unwanted excess can be removed with a utility knife.
Make sure that humidity and ventilation levels are adequate to ensure complete curing of the product.

